A saddle that feels slightly too far forward or rearward can be difficult to diagnose. A knee-over-pedal-spindle check may offer a starting reference, but it cannot identify one ideal saddle position for every rider. The practical answer is to begin with a repeatable setup, make small changes and judge them on the bike, not by a single measurement or photograph.
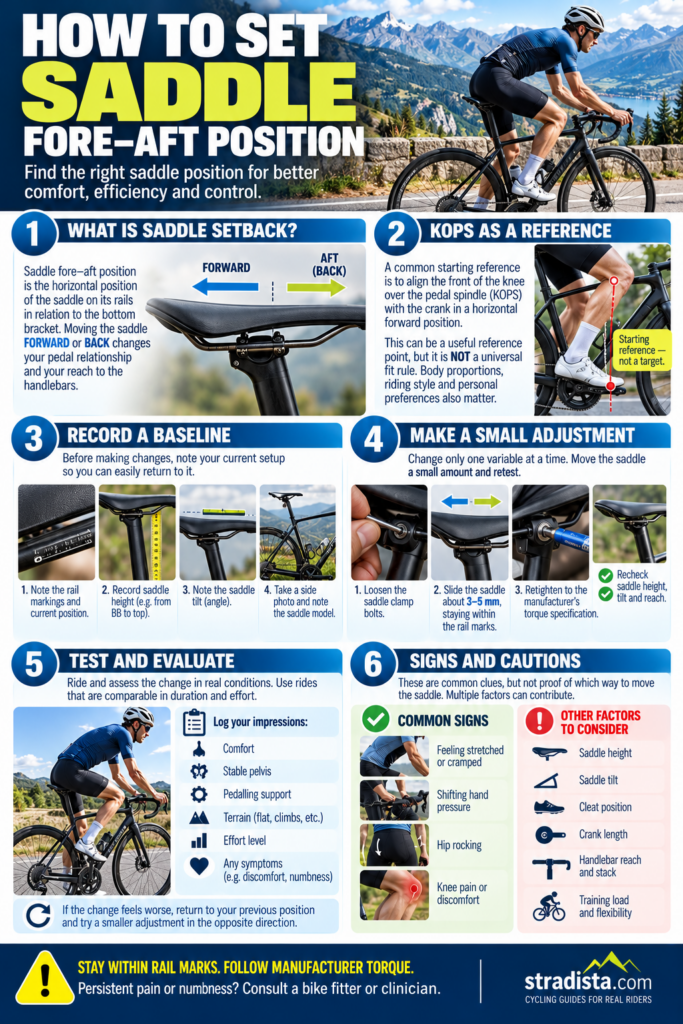
Saddle fore-aft position, also called setback, describes where the saddle sits forward or behind the bottom bracket. Adjusting it changes your relationship to the pedals and handlebars, and can affect how you support yourself on the saddle. It is one part of bike fit, not a stand-alone fix for pain or a guaranteed way to improve power.
Use alignment as a starting point, not a target
A traditional saddle-setback check uses the knee-over-pedal-spindle relationship, often shortened to KOPS. With the cranks level, a fitter or helper may compare the position of the rider’s knee with the pedal spindle. This can provide a consistent reference when establishing a starting position or checking a markedly unusual setup.
KOPS is a static convention, not a rule that every rider’s knee must meet exactly. It does not account for all the differences in anatomy, bicycle geometry, saddle shape, cadence or riding posture. A position that looks neatly aligned while you are stationary may still feel uncomfortable or unstable during a long ride. Conversely, a position that does not match a textbook line is not automatically wrong.
Use the check alongside more useful riding questions: can you pedal steadily without feeling cramped or overextended? Can you support your weight comfortably on the saddle? Does your pelvis remain stable, and does the position still feel acceptable when you climb or ride at your usual effort?
Establish a baseline before moving anything
If your current position is reasonably comfortable, record it before experimenting. Note the saddle’s rail markings, its height and tilt, and the saddle model. A side-on photograph can help you reproduce the setup, but it should document the position rather than decide whether it is correct. If you change saddles, remember that their shapes and usable sitting areas differ. Measuring from the nose alone can make two saddles appear to be in the same position when they do not support you in the same place.
Assess fore-aft with the saddle at the height and tilt you intend to ride, wearing your usual cycling shoes. Keep the cranks in a consistent position for any static comparison. If you use KOPS, have a helper check it or use a repeatable side view, but treat the result as a reference rather than a verdict.
Also make sure you are not trying to solve a different problem. Saddle height, tilt, cleat position, handlebar reach, saddle shape and frame fit can all affect comfort and how you pedal. If several of these are unsettled, it will be difficult to tell whether a fore-aft adjustment helped.
Make one small adjustment and keep the change reversible
Start with a movement of about 3–5 mm, then test before making another change. That range is small enough to preserve your baseline but can still be noticeable. Record which direction you moved the saddle and by how much. Avoid moving it several centimetres just because the first position feels slightly wrong: a large change can alter reach and support enough to introduce new problems, while making it harder to identify what caused them.
Before loosening the clamp, check the saddle-rail and seatpost markings and the component instructions. Stay within the marked adjustment limits. Saddle rails, clamp shapes and seatposts are not all interchangeable, and some components have specific compatibility or assembly requirements. Use the correct tool and follow the manufacturer’s instructions for tightening, including any specified torque. Do not guess at a torque value.
After moving the saddle, check that it is held securely by the clamp and that the hardware is correctly seated. Recheck the saddle height and tilt, then reassess your reach to the bars. A fore-aft change alters your position relative to both the pedals and the handlebars; the size of that effect depends on the bike, seatpost, saddle and your posture. Do not automatically compensate with another adjustment unless you have a clear reason, or you may end up changing several variables at once.
Make only one fit change at a time. If you move the saddle and change the bar position on the same day, a better or worse ride will not tell you which change mattered.
Judge the position on rides that reflect how you use the bike
A brief spin can reveal an obvious problem, but it cannot establish how a position will feel after an hour. Test each candidate on comparable rides, including steady endurance riding and the climbing or higher-effort riding you normally do. If discomfort tends to appear late in a ride, the test needs to be long enough to reproduce that situation safely.
Keep a simple log: the date, direction and size of the change, rail marking, saddle height and tilt, ride duration, terrain, effort and any symptoms during or after the ride. This record is more useful than trying to remember whether one position felt vaguely better a few days later.
Moving the saddle forward may feel more direct to some riders and can change how far they reach to the bars. Moving it rearward may change the rider’s position relative to the pedals and the way the hips and legs work. These are possible tendencies, not dependable rules about which direction will reduce joint loading, increase power or feel best. The result depends on the rider and the rest of the setup.
Choose a position based on repeatable comfort, stable support and controlled pedaling in the situations that matter to you. One ride is not proof, especially if the route, effort or fatigue level differed substantially from your usual test.
Treat symptoms as clues, not instructions
A symptom can prompt a useful fit check, but it cannot tell you by itself which way to move the saddle. Knee discomfort, for example, does not prove that the saddle is too far forward or too far back. Saddle height, cleats, workload and other factors may also be relevant. The same caution applies to hip or hamstring tension, hand pressure, saddle discomfort and a feeling of being cramped.
If you feel too stretched out after a fore-aft change, check the new reach and confirm that the saddle is still supporting you where you naturally sit. If you feel cramped, check whether the move has brought you closer to the bars or changed your pedaling position. A change in saddle shape can also affect where you sit, so do not compare nose measurements alone across different models.
If your pelvis rocks, you feel unstable on the saddle, or pressure shifts noticeably, check saddle height and tilt as well as fore-aft. These signs do not identify a single cause. Likewise, if a position seems comfortable on the flat but not while climbing, repeat the test under comparable conditions and consider whether your posture or effort changes before making another adjustment.
Community discussions often describe fore-aft in terms of how the rider’s weight feels over the pedals, and riders report different preferences for climbing, cadence and riding posture. Those accounts can suggest questions to test, but they are not evidence for a universal position or a way to diagnose pain.
Know when home adjustments are no longer the answer
Stop experimenting and seek help from a qualified bike fitter or health professional if pain persists, worsens, is sharp, follows an injury, causes numbness or weakness, or interferes with normal function. A saddle adjustment may be worth investigating as one possible contributor, but the available evidence does not establish a fore-aft setting as treatment for a particular condition.
There is no separate fore-aft formula established for cyclists over 50. A history of knee, hip, back or pelvic problems, surgery, or reduced mobility can make gradual changes and a professional assessment especially useful, but age alone does not determine saddle setback. For a home test, the soundest next step is simple: preserve your current setup, check the component limits, move the saddle only a few millimetres, and compare the new position on realistic rides. If the result is unclear or symptoms continue, stop adding adjustments and get the fit or the symptoms assessed.