A saddle that is too high can make you reach for the pedals; one that is too low can leave your knee feeling cramped. But there is no single saddle-height number or knee angle that suits every cyclist. An inseam formula can give you a starting estimate, not a final answer.
A better method is to measure your current position consistently, then check how you pedal on the bike you actually ride. Look for moderate knee bend near the bottom of the stroke, a stable pelvis and a foot position that does not change dramatically to reach the pedal. If you adjust, move the saddle a little at a time and test one change before making another. That approach is useful whether you are setting up a new bike, returning to riding after a break or trying to make sense of discomfort. It also avoids a common dead end: treating knee pain, or one angle measured from a video, as proof that saddle height is the cause.
Start with a measurement you can repeat
For a useful baseline, measure from the centre of the bottom bracket to the top centre of the saddle, following the line of the seat tube. Keep the tape measure aligned with that line rather than measuring vertically from the floor. Floor-to-saddle measurements and other methods may be useful for particular purposes, but their numbers are not directly interchangeable with this one.
Record the measurement and how you took it. Note the saddle model and position, your shoes and pedals, cleat setup if you use clipless pedals, and the crank length if known. Those details matter: changing the saddle, shoes, pedals or crank can change how far your leg extends at the bottom of the stroke, even if the recorded saddle-height number stays the same.
This measurement is most useful for restoring a position after maintenance or comparing adjustments on the same bike. It does not automatically transfer to another bicycle. Different frame geometry, crank length, saddle shape and pedal or shoe systems can all affect the rider’s position.
If you are starting from scratch, an inseam-based formula can help narrow the range of possible settings. The result depends on how you measure inseam and on the equipment and riding position used, so do not treat its decimal places as meaningful precision. Check the result while pedalling on the actual bike rather than accepting the formula as your finished fit.
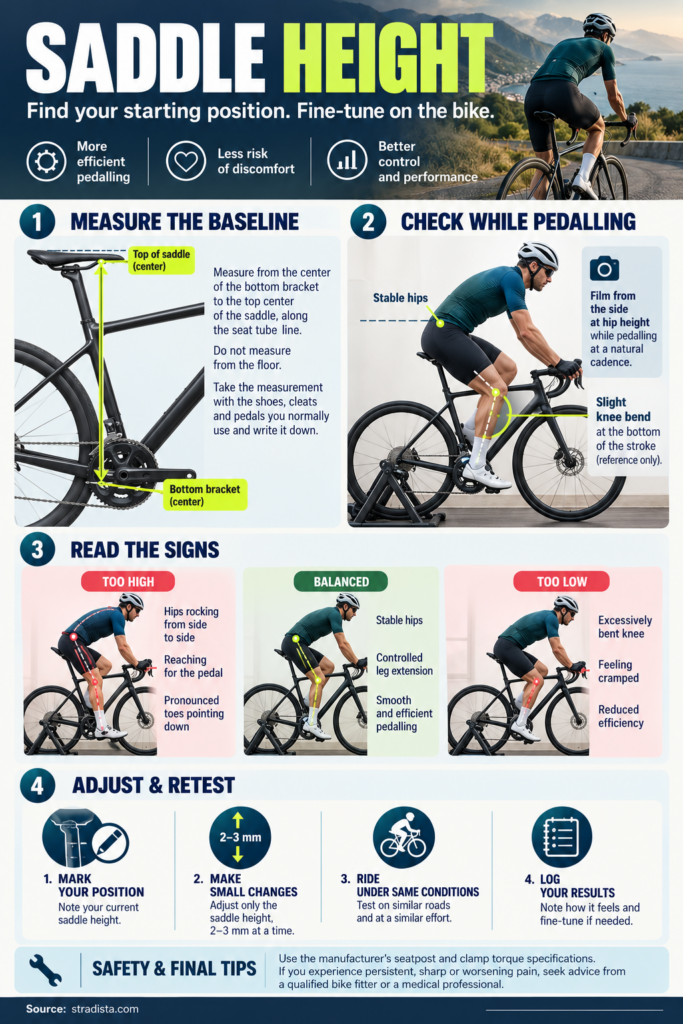
Check your movement while pedalling
Use your normal riding shoes, pedals and cleats. Secure the bike on a trainer or ask someone to hold it steadily, then pedal at an easy, natural cadence. A side-on phone video can help: place the camera perpendicular to the bike, at about hip height, and record several steady pedal strokes. Avoid judging the fit from a single frozen frame or from a pose you have deliberately arranged.
At the bottom of the stroke, your knee should retain some bend rather than locking straight. One commonly cited starting range is about 25–35 degrees of knee flexion. Other cycling guidance uses roughly 30–40 degrees, depending on the measurement method and the point in the pedal stroke being assessed. These ranges are references, not competing laws or targets that every rider must hit.
Part of the apparent disagreement comes from how an angle is described. “Knee flexion” measures how bent the knee is; some methods instead report the larger angle formed by the thigh and lower leg. The result also changes with the anatomical landmarks selected, the exact moment measured and the rider’s ankle movement. If you use an app or video analysis, check what its angle represents before comparing it with a published range.
The video is at least as useful for showing movement as for estimating an angle. Look for your pelvis rocking from side to side, your hips dropping to reach the pedals, or your toes pointing noticeably downward near the bottom of the stroke. Those can be signs that the saddle is too high, but they are clues to investigate, not a diagnosis. A rider may naturally move the ankle, and a camera view cannot explain every fit issue.
Also notice whether you feel cramped at the top of the stroke or have to reach to keep contact with the pedals. Excessive knee bend near the bottom can suggest a low saddle; reaching, rocking or pronounced toe-pointing can suggest a high one. Neither observation replaces a full assessment of your position, and neither makes a single knee-angle reading decisive.
Make small changes and keep track of them
If the position looks or feels clearly wrong, correct it in small steps. Changes of about 2–3 mm are a practical way to test a borderline adjustment, not a scientifically established threshold. If the saddle is obviously far from a workable position, a larger correction may be reasonable, but avoid moving it several centimetres and then trying to work out what changed.
Change height alone, mark the original position and write down what you did. Then ride under comparable conditions: similar duration, effort, terrain and equipment. Give yourself enough time to judge ordinary comfort and pedalling stability, but stop the test if pain becomes sharp or worsens. Make another adjustment only after you have assessed the first one.
Check the saddle clamp and seatpost instructions for your particular frame and components when moving the saddle. There is no universal torque value that applies to every seatpost or saddle rail. Use the manufacturer’s specified limit and an appropriate tool; over-tightening can damage components, while an insecure clamp can let the saddle move.
After a meaningful height change, reassess the rest of the fit. Raising or lowering the saddle changes your relationship to the handlebars and pedals, and may affect how the saddle’s fore-aft position feels. Check reach, saddle setback, knee tracking and cleat position rather than assuming height was the only variable.
Use discomfort as a clue, not a diagnosis
Riders often suspect saddle height when a knee becomes uncomfortable, but pain location alone cannot tell you whether the saddle is too high or too low. An unsuitable position may contribute to discomfort, yet similar symptoms can have other explanations, including cleat position, saddle setback, footwear, changes in training load or a medical issue. Online rider discussions reflect that uncertainty, but anecdotes do not establish a reliable symptom-to-adjustment rule.
If discomfort began after a saddle-height change, restoring the previous position or testing a small adjustment may be reasonable, provided the pain is mild and does not worsen. If the problem persists, review recent changes in distance, intensity, hills or cadence as well as your equipment. Changing height, cleats and saddle setback all at once makes it much harder to identify what helped or aggravated the problem.
A heel-on-pedal check is sometimes used as a rough preliminary test, but it should not set your final position. Your heel-down posture differs from your normal foot position while riding, and ankle movement, cleats and footwear affect the effective distance to the pedal. Confirm the setup by pedalling in your usual shoes and observing your movement.
Account for your history, not an age-based formula
There is no well-established, age-specific saddle-height target for cyclists over 50. Age alone is not a reason to use a different knee-angle range or a special formula. What may change the decision is your individual history: previous knee, hip or back problems, reduced mobility, or a position that is difficult to assess because of an existing condition.
In those circumstances, gradual adjustments are especially useful because they make cause and effect easier to follow. A qualified bike fitter can assess your movement and the interaction between saddle height, setback, cleats and reach. If you have a history of injury or symptoms that complicate the assessment, a healthcare professional may also be appropriate; a bike fit is not a diagnosis or a substitute for medical care.
Seek professional assessment rather than continuing to experiment if pain is sharp, worsening, persistent or limiting normal activities. Stop testing a change that aggravates symptoms. If you arrange a fit or clinical assessment, bring your recorded measurements, notes about recent changes, and a description of when the discomfort occurs. A side-on video and information about recent training changes can also help put the problem in context.
The most useful saddle-height setting is not the one that matches a formula to the millimetre. It is a measured, repeatable starting position that lets you pedal with a stable pelvis and comfortable, controlled leg movement. Record it, change one thing at a time, and look beyond saddle height when the evidence does not point clearly to it.